
March-April 2026
A hearty Spring is coming hello from Missouri! Many of you have had a rougher winter than normal, while even some in the lower warm belt states have felt it more than normal. Hopefully it gives you some garage time to do a little maintenance and work to get your “A” ready for spring! If you haven’t touched it yet, now’s the time! It is always better and more fun to fix and restore it in your garage than on the side of the road! Your tour mates will appreciate it too!
Last month we had some great tech articles. A hearty Ahooga to Dora Popescu for his info on the Model A Horn brush springs and info. Many times the horn has it’s own mind but there are things like this that you can do to set it straight and make it better. Like any electrical connection it is important to have good clean connection. Thanks to Herb Farnsler both he and Doru teamed up from the Lehigh Valley Model A club with some excellent horn advice. If you haven’t seen it please go back and check it out. Page 12 &13 in January/February 2026 issue.
Also special thanks to Nelsen Chegezy for “Part III of his Facstinating Fasteners” on the Model A/AA Fords. He has some excellent info… I don’t know where he got it all but keep it coming Nelson!
Also, not directly technical but you will learn a lot about the different body styles available from Jim Thomas’s “Advertising the Model A Ford”. Don’t gloss over it! If you can visit the MAFFI’s Model A Ford Museum at Gilmore you will see some of the AA and Commercial Vehicles highlighted this last issue. Another reason to attend Model A Days!
We are a collective and resourceful club together. You guys have a vast knowledge base. If you have a tip, tech article, or special interest please submit it to Helen for the Model A News or forward tips to me.
I will also add that I’m planning on having a Technical “Fireside chat” or two at the repair tent at the National Meet in French Lick. Additionally I will be giving a Front Axle assembly seminar in addition to others giving seminars, including Terry Burtz on the Burtz Block, Horns by Steve Smith, John Grossheim On the Introduction and History of the Model A Ford. Also, Model A Ford heaters by Ron Lawson, and Judging seminars from Rob Mills, Gary Karr, and Stan Sorrels. For you driver guys.. who want to learn more about your “A”, don’t think the judging (JSC) seminars are just for the judging guys. It is incredible what these guys know and what you can learn that helps you with your “Driver”. Sign Up!
Now on to a few questions!
Question:
I’m having trouble getting my crank to line up with the crank nut to time the engine.
Tom S.
Answer:
There can me a number of issues causing this. First, make sure you don’t have one of the aftermarket type of front engine mounts that looks like a “beehive”. Those were made years ago by “Champ Products” actually in St. Louis, where I’m from. The problem is they are very stiff and too tall and cause the engine to sit too high. Another issue is some of the reproduction springs on each side of the yoke are too stiff and/or too tall a profile.
Note the lower spring which pulls it down on the undeath side of the crossmember typically has 5 coils, the upper two springs have 8. As per the Service Bulletins, the spring gap should be 1/64th to 1/32nd . With the correct springs and flat (auxiliary spring as Ford calls it) along with the leather washer on top of the “Auxilary “ spring, adjusted properly it should put you with a good alignment. A good test is to put your crank in, and actually pull up on the crank ( 12 o’clock position) to force the front of the engine down, and also push down on it when (6 o’clock position) to put upward force on the engine. If installed and everything correct it should float within the front mount.
I might add… that many times excess vibration is caused by poor ( worn or incorrectly installed) rear engine mounts as well as the front mount not aligned and mal-adjusted .
Rich Falucca once taught me that sometimes loosening all the engine mounts a bit, and go drive the car (even somewhat aggressively), that you can seat the engine in it’s “happy place” a bit and solve some vibration issues. I have used that tactic a number of times with success. Just don’t forget to tighten everything up!
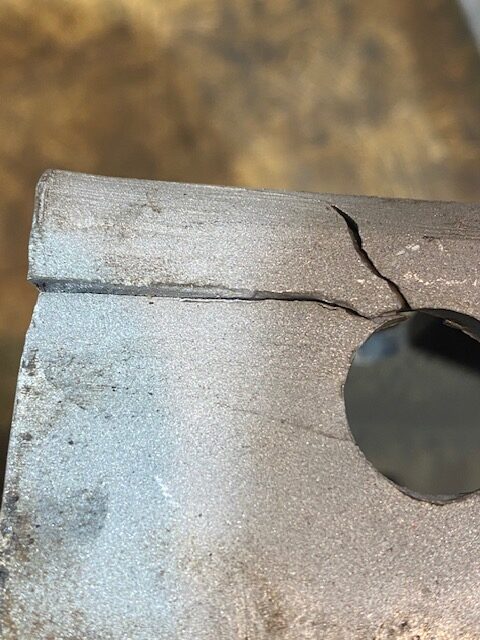
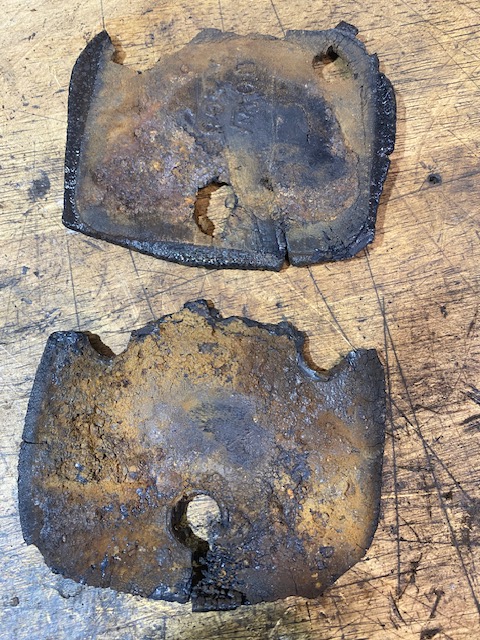
See attached front support…. And my photos of severely worn original rear mount rubber and broken rear engine mounts.
A Few Tips on the topic……….
Also, please note that the brass bushing from the bottom side of the cross member was replaced with a flat washer. It would let the engine float a bit more and reduce squeaks at that point. Also, there were several revision of the flat ( auxiliary ) spring. We have what we have from the suppliers … for the most part they seem to work OK. A little bit of red grease when installing them at the stud is a good idea as well as a little on the underneath side of the flat ( auxiliary) spring.
While we are on engine mounts… Look at the following photos. Broken Rear mounts, and original severely wore out rubber. Please make sure your engine has proper mounts and support!
Question:
I am having trouble getting my brake adjust wedge ( A-2041) in the housing. What do I do?
Tom L.
Answer:
For the sake of the readers here, I am going to explain removal and then restoration and reinstallation ( if useable). Removing it helps to use some penetrant on the threads. Use a brake wrench or 8 pt 7/16 socket. Once unscrewed, it may not come out unless you give it a light tap on the end of the stud ( should be about flush ). Once out, I glass bead blast the adjustment wedge and backing plate, or at least the threaded housing for it. It is ok to run a tap in it.. 5/8 18 . Clean out any debris, I like a light coating of Permatex purple high temp brake grease on the threads before inserting it back in. It should screw in easily. If the cones or wedges are worn replacement is in order with one of the high quality repro units.
Question:
I want to grease my rear hub bearings but I’m having trouble getting my rear hub/drums off. My HF puller isn’t doing the job. What do I do?
Tom L.
Answer:
This is somewhat of a common question but has a few answers. First of all respect the threads on the end. Mess them up you are in trouble.
The service bulletins Page 377 ( page 147 in the yellow copy) shoes the hub varieties.
The taper design is the earliest 28 design, followed by the shoulder and then grooved design. My suggestion is to see if there is someone in a local Model A Club that has a few pullers and knows how to remove them. Having the proper puller and knowing how to handle it will keep you from destroying an axle end.
The Kr Wilson ABV 156 hub puller is best for the later style ( grooved). The others can be removed with pullers of vintage or new from Snyders. The caveat is the threads. I would suggest (except krw) keeping the nut on but loose flush with the axle and using the puller with proper tightening and a wrap of the puller shaft with a decent hammer on the end if it hadn’t already moved. There are a number of vintage pullers out there like the Iindustro flip top unit I like, especially as a traveling unit.
I would refrain from loosening the nut and driving or using one of the knock off tools. Just my personal opinion. Good hub and key fit and keeping your hub tight at 100 Foot lbs is important. Once removed you can pack your hub bearing well, replace seals if needed and inspect your brakes and service otherwise as needed. This leads me to thinking we might do an article in an upcoming issue on Hub pullers and how to use them. Thanks for your question!
Question:
I am having trouble getting my fan blade off to change my water pump. I don’t want to damage the fan. What do you suggest?
Jim K.
Answer:
With the fan and pump removed, I usually loosen the nut till it’s flush with the shaft. Sometimes I’ll reverse the nut ( castles in) either way nut flush with shaft. I’m a fan of brass hammers, so I use a medium brass hammer holding the fan hub with pump below dangling, and give it a sharp wrap with the brass hammer. That will usually do the trip.
Make sure you are using one of the Newer aluminum fans, and not the steel originals. After all these years they have multiple issues that will most likely fail resulting in a dented hood, radiator, and possibly more.
If nothing else purchase a new leakless pump and new fan. Install and tighten fan nut well and install.
Question:
My Radius ball at the front wishbone/radius is worn. I’ve seen the balls available but I don’t see them listed on Snyders.
Rob J.
Answer:
I know Larry Rust did an article on relacement and repair in one of the Model A News issues a number of years ago. Hands down it is the best job I’ve seen. I was able to pull up the old Repair ball which is a well on unit from Snyders. It is part number A-3405-RK2 . I believe Larry cut his off, , tapped the wishbone assembly and the repair ball was a threaded unit, which I believe was also welded in place. Larry is in Chicago area. Realizing its not always feasible and geographically possible to have him do it. The repair kit from Snyders may be an option. On units that weren’t too bad I’ve brazed them up and shaped them back to round. In putting a caliper on the sides I the dimension is 1.475 . If it is repaired by this method it should be round and shaped properly. Fit the caps together as there must be space between them for proper fit and function.
I will post additional info on the Marc Website under the technical info when available.
Drop me an e-mail if you need more.
Question:
I have a replacement coil that has just the + and – on the terminals. The car is still 6 volt positive ground. What is the proper way to hook it up?
Jim K.
Answer: This is a common question on replacement coils… with the Model A as a positive ground car, following the polarity of the coil I would hook up the coil black wire to drivers side post ( black wire ) and red wire on the positive side. The coil should fire either way. You can do the lead pencil test or use one of the polarity testers you plug in the top of the distributor cap. Make sure it’s a non resistor type coil.
The coil should ohm out at about 1.2-1.4 ohms.